
Custom Printing - Artwork Requirements Part 1

Sorry - I couldn't resist.
So here we are with another custom printing blog. Today I'm going to start discussing artwork requirements for custom printing jobs. I don't know about you, but I hate reading super long newspaper articles. I see a story on the front page that interests me, I read the 2 columns and it says "See pg. A-4." I turn to A-4 and there's a 2-page spread (full pages) with the rest of the article. Remember the movie quote "You had me at hello"? Well, mine is "You lost me at column 4." 'cuz that's about as far as you will hold my attention. The details about artwork requirements can get a little long, so I'm going to do Part 1 today and Part 2 on Monday. These two blogs are aimed primarily at those companies who have designers of their own on staff, so if you aren't a designer and/or aren't using professional design software, much of this may sound like Greek to you.
Today's part deals with file formats and design programs. Our staff is available to assist you in collecting and submitting your files properly so we can meet your time, quality and budget demands. It's always a good idea to touch base with us before starting the project or before bringing your project to us for production. Files not properly prepared most always will be subject to design charges.
We constantly receive questions about the proper format in which files should be submitted. There are five basic acceptable formats and each has some specific requirements that go along with it.
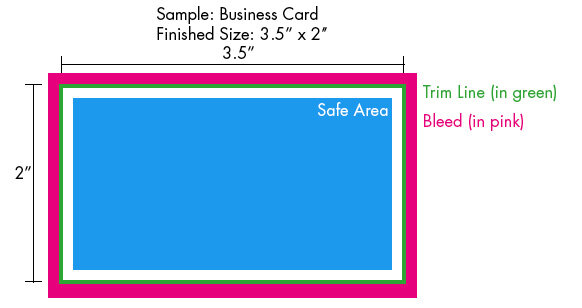
- TIFF: (Photoshop or other photo editing software) - Should be 300 dpi. Create the file at the correct size for trim (plus 1/8" on all sides if bleeds). It must be in CMYK and flattened (no layers). Do not use LZW compression.
- JPEG: (Photoshop or other photo editing software) - Should be 300 dpi. Create the file at the correct size for trim (plus 1/8" on all sides if bleeds). It must be in CMYK with no file compression.
- EPS or AI: (Illustrator, InDesign, Corel): Set all fonts to outlines (curves). Be certain that any placed images are converted from RGB to spot color or CMYK, depending on your quoted job production process. Create an area 1/8" larger (on all sides) than final trim size for all jobs that have bleeds. If a job only bleeds off one edge, you still need to include the bleed area on all four sides.
- PDF: Many software programs will export files as PDF. We do NOT recommend this option unless you are confident that your conversion settings are correct. Setting requirements are as follows: PDF 1.4 Compatible; For color and grayscale images: Bicubic Downsampling to 450 pixels per inch for images above 600 pixels per inch; For monochrome images: Bicubic Downsampling to 1200 pixels per inch for images above 1800 pixels per inch; compress text and line art; all fonts embedded or converted to outlines. Be sure your source file is created properly, with the document size being the finished trim size PLUS 1/8" all around for bleeds. Any graphics used in your file must follow the above for either EPS or TIFF.
- Application Files: Files must be provided using the integrated utilities within the application for preparation and packaging for a printer or manually collected in their entirety. This simply means that we need the original document file, all supportive graphic images and fonts used for the project being produced.
InDesign................Package (make sure there are no errors)
Publisher...............Pack and Go for commercial printer
Again, be sure the source file is created properly and that you have the extra 1/8" for bleeds if it is needed. (Do you see a pattern here? We get a LOT of files that need bleeds but don't have them...................)
All fonts must either be turned to outlines, flattened, embedded following the guidelines above or supplied to us with the job files.
Lastly, please note that PowerPoint is not a program that can be used in any way for commercial printing. It is designed for documents that will be displayed electronically (email, websites, projected on screens). It absolutely cannot be used for printing. If you send us a PowerPoint file, we will have to recreate it as best as we can and you will incur significant design charges.
If you have any questions about anything discussed here, feel free to call our design department and ask for Sarah or Andrew. They'll be happy to answer any of your questions.
That brings us to the end of Part 1. See you on Monday for Part 2.